Lottie Animations in Xamarin
Will Hutchinson (@tetowill)
may 31st, 2017
We do a lot of work with apps and Xamarin here at Infinity. We’ve seen that adding animations to our Xamarin.iOS or Xamarin.Android app makes for a more appealing user experience. But if those animations are overly detailed, programming them may take quite a bit of time. Well, thanks to Lottie (an Open Source animation tool from Airbnb) and Lottie Xamarin (a set of Xamarin bindings for Lottie created by Martijn van Dijk), it’s a lot easier to add animations into our apps. Let’s check it out.
What’s It Do?
Lottie allows us to take an animation created in Adobe After Effects and play it natively in our apps by reading the animation data, which we can export as a JSON file using an After Effects extension called Bodymovin. This is awesome because we can make some pretty cool, detailed animations in After Effects.
One of the main benefits to this is that when the design team passes the developer a motion comp and JSON file of the animation, the developer can use Lottie to make the animation run in the app exactly as it was designed. No more trying to program every detail to match the comp.

Exporting Animation Data
First we need an animation in After Effects. We won’t get into actually creating an animation in After Effects; there are plenty of YouTube videos out there if you’d like to learn that. But we will quickly show how to export the animation data for Lottie.
A good resource is Lottie Files, a gallery site where people can share free Lottie animations. Some of the animations uploaded are just the exported JSON file but others also come with the After Effects file so you can make changes. Another resource is the After Effects samples in Airbnb’s Lottie GitHub repos. We’re going to use their Lottie Logo example.
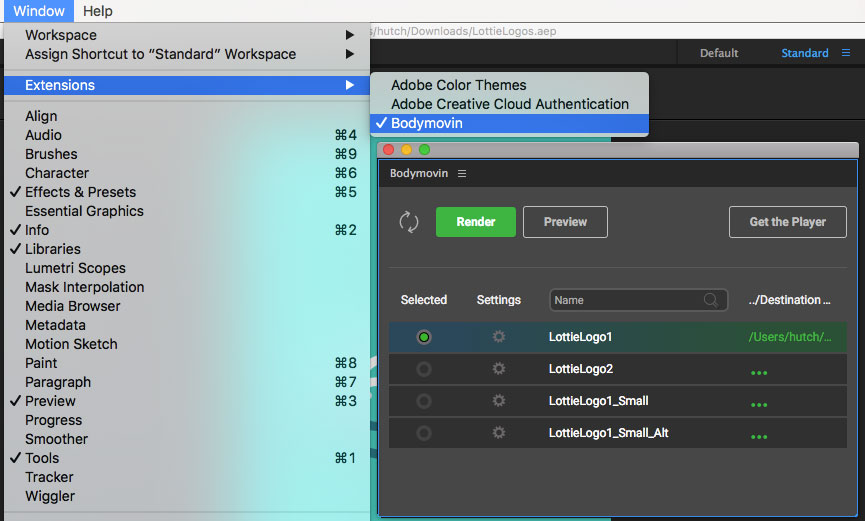
Next, install Bodymovin, following their instructions on GitHub. With that installed we open our animation file and export the data using the Bodymovin extension. Once the extension window is open, we select the composition to export and choose a location for the JSON file. Then select Render to export the JSON file. The animation JSON file is now ready to be integrated into the app.

Lottie in Xamarin.Android
To use Lottie in our Xamarin.Android app we first add the Lottie for
Xamarin.Android NuGet package to our Android project. Then we put our
animation JSON file in our Android Assets folder. We’re using the
LottieLogo1.json example.
We add our AnimationView to our layout AXML file.
<com.airbnb.lottie.LottieAnimationView
    android:id="@+id/animation_view"
    android:layout_width="wrap_content"
    android:layout_height="wrap_content" />
Then in our code behind we add a using statement for Lottie.
using Com.Airbnb.Lottie;We can set up our AnimationView in our OnCreate method.
LottieAnimationView animationView = FindViewById<LottieAnimationView>(Resource.Id.animation_view);
animationView.SetAnimation("LottieLogo1.json");
animationView.Loop(true);
animationView.PlayAnimation();
Once we create our AnimationView we then set up custom timing of our
animation using a ValueAnimator. This also allows us to add an on
complete callback as well. So instead of setting loop and calling
PlayAnimation on our AnimationView, we set up a ValueAnimator to
update the AnimationView.Progress then start our ValueAnimator to
play the animation.
// set up AnimationView in OnCreate
LottieAnimationView animationView = FindViewById<LottieAnimationView>(Resource.Id.animation_view);
animationView.SetAnimation("LottieLogo1.json");

// Custom animation speed or duration.
ValueAnimator animator = (ValueAnimator)ValueAnimator.OfFloat(0f, 1f).SetDuration(5000);
animator.Update += (sender, e) =>
{
    animationView.Progress = (float)e.Animation.AnimatedValue;
};
animator.AnimationEnd += (sender, e) => {
    // Do something
};
animator.Start();
Lottie in Xamarin.iOS
To use Lottie in our Xamarin.iOS app we first need to add the Lottie for Xamarin.iOS, macOS and tvOS NuGet package to our iOS project. Then we need to put our animation JSON file in our iOS Resources folder.
In our ViewController we add a using statement for Lottie.
using Airbnb.Lottie;In our ViewDidLoad method we set up our AnimationView.
LOTAnimationView animation = LOTAnimationView.AnimationNamed("LottieLogo1");
animation.LoopAnimation = true;
this.View.AddSubview(animation);
animation.PlayWithCompletion((animationFinished) => {
    // Do Something
});
The animation speed can also be adjusted, with negative numbers playing the animation in reverse.
animation.AnimationSpeed = -1;Lottie in Xamarin.Forms
If we’re building a Xamarin.Forms app we need to add the Lottie for Xamarin.Forms NuGet package to our shared, Android and iOS projects. When adding it to Android and iOS it should also add Lottie for Xamarin.Android and Lottie for Xamarin.iOS, macOS and tvOS, respectively.
In our iOS project we need to open AppDelegate.cs and initialize an
AnimationViewRenderer. First add the using statement for the iOS
renderers.
using Lottie.Forms.iOS.Renderers;Initialize the renderer in FinishedLaunching after Xamarin.Forms is
initialized.
AnimationViewRenderer.Init();Again, we add our animation JSON file to our Android Assets folder and our iOS Resources folder.
Our AnimationView is added in our XAML page:
<?xml version="1.0" encoding="utf-8" ?>
<ContentPage
    xmlns="http://xamarin.com/schemas/2014/forms"
    xmlns:x="http://schemas.microsoft.com/winfx/2009/xaml"
    xmlns:forms="clr-namespace:Lottie.Forms;assembly=Lottie.Forms"
    x:Class="LottieTest.LottieTestPage">

    <StackLayout>

        <forms:AnimationView
            x:Name="AnimationView"
            Animation="LottieLogo1.json"
            Loop="true"
            AutoPlay="true"
            VerticalOptions="FillAndExpand"
            HorizontalOptions="FillAndExpand" />

    </StackLayout>
</ContentPage>
In our code behind we add a using statement for Lottie.
using Lottie.Forms;The animation properties can be accessed there as well.
AnimationView.AutoPlay = false;
AnimationView.Loop = true;

AnimationView.OnPlay += (sender, e) => {
    // Do something
};

AnimationView.OnPause += (sender, e) => {
    // Do something
};

AnimationView.Pause();
AnimationView.Play();
Unfortunately, in Xamarin.Forms we don’t have as much control over our animations. So if more detailed control over animations and events is needed, use separate Android and iOS implementations.
Final Thoughts
The ability to easily use animations created in After Effects in our Xamarin apps is amazing. I’m really excited to play around more with Lottie and create some custom After Effect animations. I’d like to thank Airbnb for creating Lottie, Martijn van Dijk for creating the Xamarin bindings and both for sharing their work as Open Source software under the Apache 2.0 license.
In this post, I’ve quickly shown how to set up the basic framework along with a few controls. If you’re interested in trying out Lottie I’d suggest also looking through the documentation on the Lottie Xamarin GitHub repo and playing around with Lottie yourself to get a better feel for how it might help you out with incorporating animations in your own Xamarin apps.
Thanks for reading. Cheers!
Tags: technology xamarin animation